HIKING THE 48 4000-FOOTERS OF NH IN WINTER
All of the 4000-Footers of New Hampshire can be hiked in winter, and many hikers set out to do just that.
While we should all have a healthy fear of these mountains, especially in winter, all of these peaks can be climbed if you have the proper gear, the necessary skills, and favorable weather conditions.
If you are going to hike some or all of the NH 4000-footers, I highly recommend purchasing one or both of these excellent guidebooks on Amazon.com (affiliate links):
AMC White Mountain Guide (31st Edition)
Climbing New Hampshire's 48 4,000 Footers (1st Edition)
If you are looking to hike these mountains in the the non-winter seasons (i.e. from late spring through early fall), visit my Hiking the 4000-Footers page.
Follow New England Waterfalls on Facebook! 
MOUNTAIN
(click link for pictures) |
LEVEL OF DIFFICULTY
IN **WINTER**
(of the standard route; see list of standard routes below) |
SCENIC / VIEW
RATING |
OTHER 4000-FOOTERS COMMONLY HIKED
WITH IN
**WINTER** |
FUN & RELATIVELY
SAFE FOR BEGINNERS
IN **WINTER**? |
TRAIL INFO |
ADAMS 
(5,774 feet) |
10
(extremely difficult) |
OUTSTANDING |
MADISON
JEFFERSON |
NO
(too difficult) |
trail info |
BOND
(4,698 feet) |
10
(extremely difficult) |
OUTSTANDING |
WEST BOND
BONDCLIFF
ZEALAND |
NO
(too difficult) |
trail info |
BONDCLIFF
(4,265 feet) |
10
(extremely difficult) |
OUTSTANDING |
BOND
WEST BOND
ZEALAND |
NO
(too difficult) |
trail info |
CABOT
(4,170 feet) |
8
(difficult) |
FAIR/GOOD
(however, 'The Horn' is nearby and has decent views) |
n/a - none |
NO
(lack of impressive views) |
trail info |
CANNON
(4,100 feet) |
8
(difficult) |
EXCELLENT |
n/a - none |
**YES**
(although a few spots near the top sometimes require crampons) |
trail info |
CARRIGAIN
(4,700 feet) |
9
(very difficult) |
OUTSTANDING
(from summit & Signal Ridge) |
n/a - none |
NO
(too difficult) |
trail info |
CARTER DOME
(4,832 feet) |
8
(difficult) |
EXCELLENT
(from nearby Mt. Hight) |
SOUTH CARTER
MIDDLE CARTER |
NO
(too difficult) |
trail info |
CARTER, MIDDLE
(4,610 feet) |
9
(very difficult) |
GOOD
(from nearby ledges) |
SOUTH CARTER
CARTER DOME |
NO
(lack of impressive views) |
trail info |
CARTER, SOUTH
(4,430 feet) |
8
(very difficult) |
POOR |
MIDDLE CARTER
CARTER DOME |
NO
(lack of impressive views) |
trail info |
EISENHOWER
(4,780 feet) |
9
(very difficult) |
EXCELLENT |
PIERCE |
NO
(too difficult) |
trail info |
FIELD
(4,340 feet) |
7
(moderately difficult) |
FAIR/GOOD |
TOM
WILLEY |
**YES**
(although views are
somewhat limited) |
trail info |
FLUME
(4,328 feet) |
8
(difficult) |
EXCELLENT |
LIBERTY |
NO
(too difficult) |
trail info |
GALEHEAD
(4,024 feet) |
9
(very difficult) |
GOOD
(from nearby AMC Galehead Hut) |
SOUTH TWIN
NORTH TWIN
GARFIELD |
NO
(too difficult) |
trail info |
GARFIELD
(4,500 feet) |
9
(very difficult) |
OUTSTANDING |
GALEHEAD |
**YES**
(although mileage is longer in winter due to closed access road) |
trail info |
HALE
(4,054 feet) |
7
(moderately difficult) |
POOR |
n/a - none |
NO
(lack of impressive views) |
trail info |
HANCOCK
(4,420 feet) |
8
(difficult) |
FAIR |
SOUTH HANCOCK |
NO
(lack of impressive views) |
trail info |
HANCOCK, SOUTH
(4,319 feet) |
8
(difficult) |
FAIR |
HANCOCK |
NO
(lack of impressive views) |
trail info |
ISOLATION
(4,004 feet) |
10
(extremely difficult) |
GOOD/GREAT |
n/a - none |
NO
(too difficult) |
trail info |
JACKSON
(4,052 feet) |
8
(difficult) |
GOOD/GREAT |
PIERCE |
NO
(too difficult) |
trail info |
JEFFERSON
(5,712 feet) |
10
(extremely difficult) |
OUTSTANDING |
WASHINGTON |
NO
(too difficult) |
trail info |
KINSMAN, NORTH
(4,293 feet) |
8
(difficult) |
GOOD
(from nearby ledge) |
SOUTH KINSMAN |
NO
(too difficult) |
trail info |
KINSMAN, SOUTH
(4,358 feet) |
8
(difficult) |
FAIR/GOOD |
NORTH KINSMAN |
NO
(too difficult) |
trail info |
LAFAYETTE
(5,260 feet) |
9
(very difficult) |
OUTSTANDING |
LINCOLN |
NO
(too difficult) |
trail info |
LIBERTY
(4,459 feet) |
8
(difficult) |
EXCELLENT |
FLUME |
NO
(too difficult) |
trail info |
LINCOLN
(5,089 feet) |
9
(very difficult) |
OUTSTANDING |
LAFAYETTE |
NO
(too difficult) |
trail info |
MADISON
(5,367 feet) |
9
(very difficult) |
OUTSTANDING |
ADAMS |
NO
(too difficult) |
trail info |
MONROE
(5,384 feet) |
9
(very difficult) |
OUTSTANDING |
WASHINGTON |
NO
(too difficult) |
trail info |
MOOSILAUKE
(4,802 feet) |
9
(very difficult) |
EXCELLENT |
n/a - none |
NO
(too difficult) |
trail info |
MORIAH
(4,049 feet) |
8
(difficult) |
GREAT |
n/a - none |
NO
(too difficult) |
trail info |
OSCEOLA
(4,340 feet) |
9
(very difficult) |
EXCELLENT |
EAST OSCEOLA |
NO
(too difficult) |
trail info |
OSCEOLA, EAST
(4,156 feet) |
9
(very difficult) |
POOR |
OSCEOLA |
NO
(lack of impressive views) |
trail info |
OWLS HEAD
(4,025 feet) |
10
(extremely difficult) |
FAIR
(from slide path en route) |
n/a - none |
NO
(too difficult) |
trail info |
PASSACONAWAY
(4,043 feet) |
8
(difficult) |
GOOD/GREAT
(best view is on 0.3 mile spur) |
WHITEFACE |
NO
(too difficult) |
trail info |
PIERCE
(4,310 feet) |
7
(moderate) |
GREAT |
JACKSON
EISENHOWER |
**YES**
(although avoid in poor weather) |
trail info |
TECUMSEH
(4,003 feet) |
6
(moderate) |
GOOD/GREAT |
n/a - none |
**YES** |
trail info |
TOM
(4,051 feet) |
5
(moderate) |
FAIR |
FIELD
WILLEY |
**YES** |
trail info |
TRIPYRAMID, MIDDLE
(4,140 feet) |
9
(very difficult) |
POOR/FAIR |
NORTH TRIPYRAMID |
NO
(the views aren't great) |
trail info |
TRIPYRAMID, NORTH
(4,180 feet) |
9
(very difficult) |
FAIR |
MIDDLE TRIPYRAMID |
NO
(the views aren't great) |
trail info |
TWIN, NORTH
(4,761 feet) |
9
(very difficult) |
EXCELLENT |
SOUTH TWIN
GALEHEAD |
NO
(too difficult) |
trail info |
TWIN, SOUTH
(4,902 feet) |
9
(very difficult) |
EXCELLENT |
NORTH TWIN
GALEHEAD |
NO
(too difficult) |
trail info |
WASHINGTON
(6,288 feet) |
10
(extremely difficult) |
OUTSTANDING |
MONROE
JEFFERSON |
NO
(too difficult) |
trail info |
WAUMBEK
(4,006 feet) |
6
(moderate) |
GOOD
(from Starr King & an outlook 0.1 mile past the summit) |
n/a - none |
**YES** |
trail info |
WEST BOND
(4,540 feet) |
10
(extremely difficult) |
OUTSTANDING |
BOND
BONDCLIFF
ZEALAND |
NO
(too difficult) |
trail info |
WHITEFACE
(4,020 feet) |
9
(very difficult) |
GREAT/EXCELLENT
(from nearby ledges) |
PASSACONAWAY |
NO
(too difficult) |
trail info |
WILDCAT
(4,422 feet) |
9
(very difficult) |
GOOD/GREAT
(from nearby outlooks/ski area) |
WILDCAT "D" PEAK |
NO
(too difficult) |
trail info |
WILDCAT, PEAK D
(4,050 feet) |
9
(very difficult) |
GOOD/GREAT
(from nearby outlooks/ski area) |
WILDCAT |
NO
(too difficult) |
trail info |
WILLEY
(4,285 feet) |
8
(difficult) |
FAIR/GOOD |
TOM
FIELD |
**YES**
(although views are
somewhat limited) |
trail info |
ZEALAND
(4,260 feet) |
10
(extremely difficult) |
POOR
(however, Zeacliff is nearby and has outstanding views) |
BOND
WEST BOND
BONDCLIFF |
NO
(too difficult) |
trail info |
STANDARD HIKING ROUTES TO THE 4000-FOOTERS IN WINTER
Presented below are the most common routes used to hike each of New Hampshire's 4000-footers in the winter season, along with their total mileage and elevation gain. I have also done my best to estimate how frequently crampons are needed on each of the peaks. Microspikes or Hillsounds (or their equivalent) will likely be needed on ALL of these peaks in winter, unless the snow is deep enough on the ENTIRE trail to warrant using snowshoes from start-to-finish (keep in mind that such good snow conditions can be rare).
In addition to reading these notes, you should always check the latest trail conditions for these peaks at trailsnh.com. I would also like to encourage you to write and submit online trip reports in winter to help others understand and see the latest winter trail conditions. A great website to submit trip reports is newenglandtrailconditions.com.
- ADAMS = Appalachia/US 2 trailhead > Valley Way > Gulfside Trail > Air Line Trail > summit
- 9.4 miles round-trip; 4,500ft gain; extremely difficult
- crampons are almost always required on this mountain in winter; an ice ax is also sometimes needed
---------------------------------------------------------------------------------------------------------------------------------------------
- BOND = this mountain is typically combined with Bond and Bondcliff in the winter to bag three peaks in one day: Lincoln Woods trailhead on NH 112 (the Kancamagus Highway) > Lincoln Woods Trail > Wilderness Trail > Bondcliff Trail > Bondcliff summit > Bondcliff Trail > Mt. Bond summit > Bondcliff Trail > West Bond Spur Trail > West Bond summit
- 22.6 miles round-trip; 4,800ft gain; extremely difficult
- crampons are almost always required on these mountains in winter
---------------------------------------------------------------------------------------------------------------------------------------------
- BONDCLIFF = this mountain is typically combined with Bond and Bondcliff in the winter to bag three peaks in one day: Lincoln Woods trailhead on NH 112 (the Kancamagus Highway) > Lincoln Woods Trail > Wilderness Trail > Bondcliff Trail > Bondcliff summit > Bondcliff Trail > Mt. Bond summit > Bondcliff Trail > West Bond Spur Trail > West Bond summit
- 22.6 miles round-trip; 4,800ft gain; extremely difficult
- crampons are almost always required on these mountains in winter
---------------------------------------------------------------------------------------------------------------------------------------------
- CABOT = York Pond Road trailhead > York Pond Trail > Bunnell Notch Trail > Mt. Cabot Trail > summit
- 9.6 miles round-trip; 2,900ft gain; difficult
- crampons are typically not needed on this mountain in winter; however, conditions vary and it is possible you will need them
---------------------------------------------------------------------------------------------------------------------------------------------
- CANNON = Lafayette Campground/I-93 trailhead > Lonesome Lake Trail > Kinsman Ridge Trail > summit
- 6.4 miles round-trip; 2,300ft gain; difficult
- crampons are sometimes required on several short stretches on this mountain in winter
---------------------------------------------------------------------------------------------------------------------------------------------
- CARRIGAIN = Sawyer Pond Road winter trailhead within several feet of US 302 > 2.0 mile road walk along Sawyer Pond Road > Signal Ridge Trail > summit
- 14.0 miles round-trip; 3,900ft gain; very difficult
- crampons are typically not needed on this mountain in winter; however, conditions vary and it is possible you will need them
---------------------------------------------------------------------------------------------------------------------------------------------
- CARTER DOME = NH 16 trailhead > Nineteen Mile Brook Trail > Carter Dome Trail > Carter-Moriah Trail > Mt. Hight summit > Carter-Moriah Trail > Carter Dome summit
- 10.2 miles round-trip; 3,500ft gain; difficult
- crampons are sometimes required on this mountain in winter
---------------------------------------------------------------------------------------------------------------------------------------------
- CARTER, MIDDLE = NH 16 trailhead > Nineteen Mile Brook Trail > Carter Dome Trail > Carter-Moriah Trail > South Carter summit > Carter-Moriah Trail > Middle Carter summit > Carter-Moriah Trail > North Carter Trail > Imp Trail (northern segment) > The Imp viewpoint > Imp Trail (northern segment) > NH 16 > road walk heading south > end
- 12.7 mile counterclockwise loop; 3,750ft gain; very difficult
- crampons are sometimes required on these two mountains in winter
---------------------------------------------------------------------------------------------------------------------------------------------
- CARTER, SOUTH = there are several popular ways to climb this mountain, and so there's really no standard route. Here's one popular option that climbs both of the Carters in one trip: NH 16 trailhead > Nineteen Mile Brook Trail > Carter Dome Trail > Carter-Moriah Trail > South Carter summit > Carter-Moriah Trail > Middle Carter summit > Carter-Moriah Trail > North Carter Trail > Imp Trail (northern segment) > The Imp viewpoint > Imp Trail (northern segment) > NH 16 > road walk heading south > end
- 12.7 mile counterclockwise loop; 3,750ft gain; very difficult
- crampons are sometimes required on these two mountains in winter
---------------------------------------------------------------------------------------------------------------------------------------------
- EISENHOWER = most people will try to hike both Mt. Eisenhower and Mt. Pierce together in winter by following this route: Mt. Clinton Road trailhead > Crawford Connector Trail > Crawford Path > Webster Cliff Trail > Mt. Pierce summit > Webster Cliff Trail > Crawford Path > Mt. Eisenhower Loop > Mt. Eisenhower summit
- 9.6 miles round-trip; 3,250ft gain; very difficult
- crampons are almost always required to reach Mt. Eisenhower in winter; crampons are sometimes needed for Mt. Pierce
---------------------------------------------------------------------------------------------------------------------------------------------
- FIELD = most people will try to hike all three peaks in the Willey Range in one day by following this route: US 302 trailhead > Avalon Trail > A-Z Trail > Mt. Tom Spur > Mt. Tom summit > Mt. Tom Spur > Willey Range Trail > Mt. Field summit > Willey Range Trail > Mt. Willey summit > Willey Range Trail > Mt. Field summit (again) > Avalon Trail > Mt. Avalon Spur Trail > Mt. Avalon summit > Mt. Avalon Spur Trail > Avalon Trail > end
- 10.0 mile clockwise semi-loop; 3,400ft gain; difficult
- crampons are typically not needed on this mountain in winter; however, conditions vary and it is possible you will need them
---------------------------------------------------------------------------------------------------------------------------------------------
- FLUME = most people will try to hike both Mt. Flume and Mt. Liberty together in winter by following this route: US 3 trailhead 0.1 mile north of the parking area for The Flume > Whitehouse Trail > Liberty Spring Trail > Franconia Ridge Trail > Mt. Liberty summit > Franconia Ridge Trail > Mt. Flume summit
- 10.2 miles round-trip; 4,250ft gain; very difficult
- crampons are sometimes needed on these mountains in winter
---------------------------------------------------------------------------------------------------------------------------------------------
- GALEHEAD = US 3 winter parking area > 1.6 mile walk on Gale River Loop Road > Gale River Trail > Garfield Ridge Trail > AMC Galehead Hut > Frost Trail > summit
- 13.5 miles round-trip; 2,800ft gain; very difficult
- crampons are typically not needed on this mountain in winter; however, conditions vary and it is possible you will need them
---------------------------------------------------------------------------------------------------------------------------------------------
- GARFIELD = US 3 winter parking area > 1.2 road walk on Gale River Loop Road > Mt. Garfield Trail > Garfield Ridge Trail > summit
- 12.4 miles round-trip; 3,200ft gain; very difficult
- crampons are typically not needed on this mountain in winter; however, conditions vary and it is possible you will need them
---------------------------------------------------------------------------------------------------------------------------------------------
- HALE = US 302 winter trailhead > 0.2 mile road walk along US 302 heading west > 2.5 mile road walk along Zealand Road > Hale Brook Trail > summit
- 9.8 miles round-trip; 2,700ft gain; moderately difficult
- crampons are typically not needed on this mountain in winter; however, conditions vary and it is possible you will need them
---------------------------------------------------------------------------------------------------------------------------------------------
- HANCOCK = 99.99% of winter peakbaggers will hike both Hancock and South Hancock on one hike: NH 112/Kancamagus Highway trailhead > Hancock Notch Trail > Cedar Brook Trail > Hancock Loop Trail > South Hancock summit > Hancock Loop Trail > Hancock summit > Hancock Loop Trail > Cedar Brook Trail > Hancock Notch Trail > end
- 9.8 mile counterclockwise semi-loop; 2,650ft gain; moderately difficult
- crampons are often required on these two mountains in winter
---------------------------------------------------------------------------------------------------------------------------------------------
- HANCOCK, SOUTH = 99.99% of winter peakbaggers will hike both Hancock and South Hancock on one hike: NH 112/Kancamagus Highway trailhead > Hancock Notch Trail > Cedar Brook Trail > Hancock Loop Trail > South Hancock summit > Hancock Loop Trail > Hancock summit > Hancock Loop Trail > Cedar Brook Trail > Hancock Notch Trail > end
- 9.8 mile counterclockwise semi-loop; 2,650ft gain; moderately difficult
- crampons are often required on these two mountains in winter
---------------------------------------------------------------------------------------------------------------------------------------------
- ISOLATION = Rocky Branch trailhead on NH 16 > Rocky Branch Trail > Engine Hill bushwhack (heading NW; good off-trail skills are required for this bushwhack) > Isolation Trail > Davis Path > spur trail to summit > summit
- 13.2 miles round-trip; 3,000ft gain; extremely difficult
- crampons are sometimes needed on this mountain in winter
---------------------------------------------------------------------------------------------------------------------------------------------
- JACKSON = US 302 trailhead > Webster-Jackson Trail (Jackson Branch) > summit
- 5.2 miles round-trip; 2,150ft gain; difficult
- crampons are often required on this mountain in winter
---------------------------------------------------------------------------------------------------------------------------------------------
- JEFFERSON = Base Road trailhead > Jewell Trail > Gulfside Trail > Mt. Jefferson Loop > summit
- 11.0 miles round-trip; 4,200ft gain; extremely difficult
- crampons are almost always required on this mountain in winter; an ice ax may also be needed
---------------------------------------------------------------------------------------------------------------------------------------------
- KINSMAN, NORTH = 99.99% of hikers will try to climb both Kinsmans in one trip in all seasons. Here's the preferred route: NH 116 trailhead > Mt. Kinsman Trail > Kinsman Ridge Trail > North Kinsman summit > Kinsman Ridge Trail > South Kinsman summit
- 10.0 miles round-trip; 3,950ft gain; difficult
- crampons are typically not needed on this mountain in winter; however, conditions vary and it is possible you will need them
---------------------------------------------------------------------------------------------------------------------------------------------
- KINSMAN, SOUTH = 99.99% of hikers will try to climb both Kinsmans in one trip in all seasons. Here's the preferred route: NH 116 trailhead > Mt. Kinsman Trail > Kinsman Ridge Trail > North Kinsman summit > Kinsman Ridge Trail > South Kinsman summit
- 10.0 miles round-trip; 3,950ft gain; difficult
- crampons are typically not needed on this mountain in winter; however, conditions vary and it is possible you will need them
---------------------------------------------------------------------------------------------------------------------------------------------
- LAFAYETTE = most hikers will try to climb both Lafayette and Lincoln in one trip in all seasons: I-93 trailhead > Falling Waters Trail > Franconia Ridge Trail > Mt. Lincoln summit
> Franconia Ridge Trail > Mt. Lafayette summit
> Greenleaf Trail > Old Bridle Path > End
- 8.9 mile counterclockwise loop; 3,900ft gain; very difficult
- crampons are almost always required on both of these mountains in winter; an ice ax is also sometimes needed
---------------------------------------------------------------------------------------------------------------------------------------------
- LIBERTY = most people will try to hike both Mt. Flume and Mt. Liberty together in winter by following this route: US 3 trailhead 0.1 mile north of the parking area for The Flume > Whitehouse Trail > Liberty Spring Trail > Franconia Ridge Trail > Mt. Liberty summit > Franconia Ridge Trail > Mt. Flume summit
- 10.2 miles round-trip; 4,250ft gain; very difficult
- crampons are sometimes needed on these mountains in winter
---------------------------------------------------------------------------------------------------------------------------------------------
- LINCOLN = most hikers will try to climb both Lafayette and Lincoln in one trip in all seasons: I-93 trailhead > Falling Waters Trail > Franconia Ridge Trail > Mt. Lincoln summit > Franconia Ridge Trail > Mt. Lafayette summit > Greenleaf Trail > Old Bridle Path > End
- 8.9 mile counterclockwise loop; 3,900ft gain; very difficult
- crampons are almost always required on both of these mountains in winter; an ice ax is also sometimes needed
---------------------------------------------------------------------------------------------------------------------------------------------
- MADISON = Appalachia/US 2 trailhead > Valley Way > Osgood Trail > summit
- 8.6 miles round-trip; 4,100ft gain; very difficult
- crampons are almost always required on this mountain in winter; an ice ax is also sometimes needed
---------------------------------------------------------------------------------------------------------------------------------------------
- MONROE = Base Road trailhead > Ammonoosuc Ravine Trail > Crawford Path > Mt. Monroe Loop > summit
- 7.0 miles round-trip; 2,900ft gain; very difficult
- crampons are almost always required on this mountain in winter; an ice ax is also sometimes needed
---------------------------------------------------------------------------------------------------------------------------------------------
- MOOSILAUKE = parking area on NH 118 at the start of Ravine Lodge Road > 1.6 mile road walk along Ravine Lodge Road > Gorge Brook Trail > summit
- 10.5 miles round-trip; 3,000ft gain; difficult
- crampons are often required on this mountain in winter
---------------------------------------------------------------------------------------------------------------------------------------------
- MORIAH = NH 16 trailhead > Stony Brook Trail > Carter-Moriah Trail
- 10.0 miles round-trip; 3,150ft gain; difficult
- crampons are often required on this mountain in winter
---------------------------------------------------------------------------------------------------------------------------------------------
- OSCEOLA = most hikers will try to climb both Osceola & East Osceola in one trip, and this is the route they will take in winter: NH 112/Kancamagus Highway trailhead > Greeley Ponds Trail > Mt. Osceola Trail > Osceola summit > Mt. Osceola Trail > East Osceola summit
- 7.6 miles round-trip; 3,100ft gain; very difficult
- crampons are almost always required on these two mountains in winter; an ice ax may also be needed
---------------------------------------------------------------------------------------------------------------------------------------------
- OSCEOLA, EAST = most hikers will try to climb both Osceola & East Osceola in one trip, and this is the route they will take in winter: NH 112 trailhead > Greeley Ponds Trail > Mt. Osceola Trail > Osceola summit > Mt. Osceola Trail > East Osceola summit
- 7.6 miles round-trip; 3,100ft gain; very difficult
- crampons are almost always required on these two mountains in winter; an ice ax may also be needed
---------------------------------------------------------------------------------------------------------------------------------------------
- OWLS HEAD = NH 112/Kancamagus Highway trailhead (Lincoln Woods) > Lincoln Woods Trail > Black Pond Trail > Black Pond Bushwhack > Lincoln Brook Trail > Brutus Bushwhack or Owl's Head Path > summit
- 16.2 miles round-trip; 2,900ft gain; very difficult
- crampons and an ice axe are almost always required on this mountain in winter
---------------------------------------------------------------------------------------------------------------------------------------------
- PASSACONAWAY = many hikers will try to climb both Passaconaway & Whiteface in one trip: Ferncroft Road trailhead > Blueberry Ledge Trail > Rollins Trails > Whiteface summit > Rollins Trail > Dicey's Mill Trail > Passaconaway summit > Dicey's Mill Trail > end
- 11.9 mile clockwise loop; 3,800ft gain; difficult
- crampons are often required on Mt. Whiteface in winter; crampons are typically not needed on Passaconaway; an ice ax may also be needed on Mt. Whiteface
---------------------------------------------------------------------------------------------------------------------------------------------
- PIERCE = most people will try to hike both Mt. Eisenhower and Mt. Pierce together in winter by following this route: Mt. Clinton Road trailhead > Crawford Connector Trail > Crawford Path > Webster Cliff Trail > Mt. Pierce summit > Webster Cliff Trail > Crawford Path > Mt. Eisenhower Loop > Mt. Eisenhower summit
- 9.6 miles round-trip; 3,250ft gain; very difficult (6.4 miles; 2400ft gain; moderately difficult if you only hike Pierce)
- crampons are almost always required to reach Mt. Eisenhower in winter; crampons are sometimes needed for Mt. Pierce
---------------------------------------------------------------------------------------------------------------------------------------------
- TECUMSEH = Waterville Valley Ski Resort trailhead > Mt. Tecumseh Trail > summit
- 5.0 miles round-trip; 2,300ft gain; moderate
- crampons are typically not needed on this mountain in winter; however, conditions vary and it is possible you will need them
---------------------------------------------------------------------------------------------------------------------------------------------
- TOM = most people will try to hike all three peaks in the Willey Range in one day by following this route: US 302 trailhead > Avalon Trail > A-Z Trail > Mt. Tom Spur > Mt. Tom summit > Mt. Tom Spur > Willey Range Trail > Mt. Field summit > Willey Range Trail > Mt. Willey summit > Willey Range Trail > Mt. Field summit (again) > Avalon Trail > Mt. Avalon Spur Trail > Mt. Avalon summit > Mt. Avalon Spur Trail > Avalon Trail > end
- 10.0 mile clockwise semi-loop; 3,400ft gain; difficult
- crampons are typically not needed on this mountain in winter; however, conditions vary and it is possible you will need them
---------------------------------------------------------------------------------------------------------------------------------------------
- TRIPYRAMID, MIDDLE = most hikers will bag both Middle & North Tripyramid on one winter hike using this route: NH 112 / Kancamagus Highway trailhead > Pine Bend Brook Trail > North Tripyramid summit >
Mt. Tripyramid Trail > Middle Tripyramid summit
- 9.6 miles round-trip; 3,450ft gain; difficult
- crampons are often required on these two mountains in winter
---------------------------------------------------------------------------------------------------------------------------------------------
- TRIPYRAMID, NORTH = most hikers will bag both Middle & North Tripyramid on one winter hike using this route: NH 112 / Kancamagus Highway trailhead > Pine Bend Brook Trail > North Tripyramid summit >
Mt. Tripyramid Trail > Middle Tripyramid summit
- 9.6 miles round-trip; 3,450ft gain; difficult
- crampons are often required on these two mountains in winter
---------------------------------------------------------------------------------------------------------------------------------------------
- TWIN, NORTH = most people will try to hike both Twins in one day by following this route: US 3 winter parking area > walk 2.5 miles along Haystack Road > North Twin Trail > North Twin summit > North Twin Spur Trail > South Twin summit
- 16.2 miles round-trip; 4,200ft gain; very difficult
- crampons are often needed on these two mountains in winter; an ice ax may also be needed
---------------------------------------------------------------------------------------------------------------------------------------------
- TWIN, SOUTH = most people will try to hike both Twins in one day by following this route: US 3 winter parking area > walk 2.5 miles along Haystack Road > North Twin Trail > North Twin summit > North Twin Spur Trail > South Twin summit
- 16.2 miles round-trip; 4,200ft gain; very difficult
- crampons are often needed on these two mountains in winter; an ice ax may also be needed
---------------------------------------------------------------------------------------------------------------------------------------------
- WASHINGTON = Tuckerman Ravine Trail > Lion Head Trail (winter route) > Tuckerman Ravine Trail > summit
- 8.6 miles round-trip; 4,250ft gain; extremely difficult
- crampons and an ice axe are almost always required on this mountain in winter
---------------------------------------------------------------------------------------------------------------------------------------------
- WAUMBEK = US 2 winter parking area > short walk east along US 2 > short walk north along Starr King Road > Starr King Trail > Starr King summit > Starr King Trail > Mt. Waumbek summit
> viewpoint 0.1 mile past summit
- 7.8 miles round-trip; 2,800ft gain; moderate
- crampons are typically not needed on this mountain in winter; however, conditions vary and it is possible you will need them
---------------------------------------------------------------------------------------------------------------------------------------------
- WEST BOND = this mountain is typically combined with Bond and Bondcliff in the winter to bag three peaks in one day: Lincoln Woods trailhead on NH 112 (the Kancamagus Highway) > Lincoln Woods Trail > Wilderness Trail > Bondcliff Trail > Bondcliff summit > Bondcliff Trail > Mt. Bond summit > Bondcliff Trail > West Bond Spur Trail > West Bond summit
- 22.6 miles round-trip; 4,800ft gain; extremely difficult
- crampons are almost always required on these mountains in winter
---------------------------------------------------------------------------------------------------------------------------------------------
- WHITEFACE = many hikers will try to climb both Passaconaway & Whiteface in one trip: Ferncroft Road trailhead > Blueberry Ledge Trail > Rollins Trails > Whiteface summit > Rollins Trail > Dicey's Mill Trail > Passaconaway summit > Dicey's Mill Trail > end
- 11.9 mile clockwise loop; 3,800ft gain; difficult
- crampons are often required on Mt. Whiteface in winter; crampons are typically not needed on Passaconaway; an ice ax may also be needed on Mt. Whiteface
---------------------------------------------------------------------------------------------------------------------------------------------
- WILDCAT = the vast majority of hikers will try to climb both Wildcat and Wildcat, Peak D in one trip using this route: Nineteen Brook Trail > Wildcat Ridge Trail > Wildcat summit
> Wildcat Ridge Trail > Wildcat, Peak D summit
- 12.6 miles round-trip; 4,500ft gain; very difficult
- crampons are almost always required on these mountains in winter; an ice ax may also be needed
---------------------------------------------------------------------------------------------------------------------------------------------
- WILDCAT, PEAK D = the vast majority of hikers will try to climb both Wildcat and Wildcat, Peak D in one trip using this route: Nineteen Brook Trail > Wildcat Ridge Trail > Wildcat summit > Wildcat Ridge Trail > Wildcat, Peak D summit
- 12.6 miles round-trip; 4,500ft gain; very difficult
- crampons are almost always required on these mountains in winter; an ice ax may also be needed
---------------------------------------------------------------------------------------------------------------------------------------------
- WILLEY = most people will try to hike all three peaks in the Willey Range in one day by following this route: US 302 trailhead > Avalon Trail > A-Z Trail > Mt. Tom Spur > Mt. Tom summit > Mt. Tom Spur > Willey Range Trail > Mt. Field summit > Willey Range Trail > Mt. Willey summit > Willey Range Trail > Mt. Field summit (again) > Avalon Trail > Mt. Avalon Spur Trail > Mt. Avalon summit > Mt. Avalon Spur Trail > Avalon Trail > end
- 10.0 mile clockwise semi-loop; 3,400ft gain; difficult
- crampons are typically not needed on this mountain in winter; however, conditions vary and it is possible you will need them
---------------------------------------------------------------------------------------------------------------------------------------------
- ZEALAND = 0.2 mile walk along US 302 heading west > 3.5 mile road walk along Zealand Road > Zealand Trail > Twinway > Zealand Spur Trail > Zealand summit
- 18.8 miles round-trip; 3,000ft gain; very difficult
- crampons are typically not needed on this mountain in winter; however, conditions vary and it is possible you will need them
Take note that there are alternate winter hiking routes that are commonly hiked for many of the mountains listed above. Consult the latest edition of the 4000-Footers of the White Mountains guidebook for detailed descriptions of all of the common winter hiking routes on these peaks. This book can be purchased at bookstores throughout the White Mountain region (it can be tough to find online).
If you suspect there are any errors in the above information, please email gparsons66@hotmail.com so that the error(s) can be fixed.
WHY HIKE IN WINTER?
There are many reasons why people hike New Hampshire's 4000-footers in winter. Here are some of the reasons:
- Fewer crowds
- Animal tracks are frequently seen
- Extended views (views of 75-100+ miles are sometimes possible due to the often drier/less-humid air of winter)
- Beautiful mix of white snow and rocky peaks
- Less rocky trails
- Almost no tree roots
- Butt-sliding, sledding and glissadding possibilities
- Bushwhacks are often easier in winter (and you can often follow the snowshoe tracks of others)
- No biting bugs (yay!)
- Bears are (usually) hibernating (some people have anxiety about being attacked by bears, even though attacks are almost non-existent)
- Descents are generally easier on the knees
- Better chance for solitude (although some will argue that solo hiking on some peaks in winter is not wise)
- Ability to combine hiking with cross-country skiing and/or backcountry downhill skiing
- Some (hairy/furry) dog breeds enjoy winter hiking more than summer hiking
- Many believe hiking is more challenging/fulfilling in winter
- None of the oppressive summer humidity
- Some trails and peaks are simply more stunning in winter
- Snowshoeing is an enjoyable endurance sport when conditions are favorable
TIPS FOR HIKING THE NH 4000-FOOTERS IN WINTER
OVERVIEW
Hiking the 4000 footers in winter is a whole new ball game. There is no arguing that many of these mountains are much tougher to hike when there is ice and/or snow to contend with. Some roads are closed in winter, meaning the total hiking distance will be increased for some peaks. Some peaks have to be ascended via trails that are not the standard approach in the summertime. White-outs, hypothermia, and spruce traps can be serious threats if you aren't prepared for them.
The term 'winter' is a bit confusing here because these mountains are often under winter conditions from early October through the middle of May. Occasionally, winter storms can hit in other months of the year, although such storms are quite rare (except for perhaps Mt. Washington) from June 15th through September 15th.
HIKING SAFELY IN WINTER
Winter hiking can be dangerous, but there ways to reduce/minimize the risks.
- Don't hike your first 4000-footer in the winter. Do at least one 4000-footer in the warmer-months first (preferably with others who have already done several 4000-footers before).
- Don't let your first snowshoe hike be for a 4000-footer. Snowshoe a smaller peak first (see below for a list of great snowshoe hikes below).
- Review trail conditions online to help you determine if you need to bring traction, crampons, and/or snowshoes. Trailsnh.com is the best place to start.
- Don't hike solo in winter until you have a lot of experience under your belt. Some would actually argue that some of the more difficult winter peaks should never be hiked solo.
- Always bring something you can rest on top of in case you get injured or lost (i.e. a closed-cell sleeping pad).
- Use lithium batteries in your headlamp (regular alkaline batteries will die quickly).
- Bring crampons, an ice ax, and a ski mask if you are planning on traveling above treeline. However, you must learn how to properly use both the ice ax and crampons before trying to using them on a 4000-footer.
- Know the weather before you start your hike. It's best to check the weather forecast of at least two (2) websites within an hour or twp of starting your hike if you can.
- Leave a note with someone as to which mountain(s) and trail(s) you will be hiking in winter.
- Learn how to properly layer clothing in winter.
- Keep water inside of bottle insulators (REI, EMS, etc. sell them for around $10/each). Hydration tubes (i.e. like those that come with Camelbaks), even if they have an insulated tube, generally don't cut it since they often freeze when the temperature drops below 25 or 30 degrees.
- Bring the right food/snacks (don't bring anything that will freeze - see below for winter food recommendations).
- Bring an extra pair (or two) of socks just in case you fall into a river or in the event that snow manages to get into your boots.
- High-top waterproof boots or plastic boots are required in winter.
- Drink a ton of water in winter, even if you aren't that thirsty. Dehydration can still easily occur in winter.
- Don't forget the '10 essentials'.
- Try to keep yourself from sweating during your hike (de-layer your clothing as often as needed so that you stay at a comfortable temperature - not too cold, not too hot).
- Bring a ziptie in case your snowshoes or foot traction break or rip during the hike.
WINTER CLOTHING
Special care must be taken to ensure that you use the right clothing when hiking in winter. You'll want to avoid all products that contain cotton since they usually become soaked with sweat very quickly (and it does not dry quickly). The idea is to make sure that you are always warm AND dry. As such, you really need to use clothing that wicks moisture well and dries quickly. Materials that are waterproof and highly breathable are also very important. Windproof clothing can also come in handy.
Here is my list of recommendations for winter hiking clothing:
- WATERPROOF HIKING BOOTS or MOUNTAINEERING/PLASTIC BOOTS (hiking boots with high ankle support are my preference; plastic hiking boots are generally overkill, except for when above treeline, when they are recommended)
- THICK SOCKS (I really like 'Mountaineering' type socks; some people also like to wear a thin base layer of socks as well)
- SHIRT BASE LAYER (made of a synthetic material (polypropylene, polyester, capilene, etc.) or merino wool)
- FLEECE (with weight of 200 or 300) or SOFTSHELL JACKET (preferably a 'windproof' one)
- HARDSHELL JACKET THAT IS WATERPROOF & BREATHABLE
- PANTS BASE LAYER (made of a synthetic material (polypropylene, polyester, capilene, etc.) or merino wool)
- SOFTSHELL PANTS, WATERPROOF PANTS, or THICK REGULAR HIKING PANTS (I would avoid using the bulky pants that skiers often use)
- THIN GLOVES (tip: get a pair with an 'e-tip' so that you can take pictures with your smart-phone without taking the gloves off)
- THICK GLOVES OR WARM MITTENS (mittens are preferred over gloves since they are generally much warmer)
- WINTER HAT (preferably a 'windproof' one that completely covers your ears)
Also consider bringing a pair of backup gloves, socks and/or a second winter hat in case yours get wet or soaked with your own sweat (it happens a lot). Another piece of clothing that many hikers find beneficial are gaiters. Gaiters can help keep snow out of your boots (especially when the snow is deep), and will also prevent you from cutting yourself with crampons. Hand and/or foot warmers can also come in handy if it's really cold.
Make sure that you de-layer as you get hot when hiking. Take the outer layers off, and even your gloves and hat if necessary. The idea is to avoid being too hot or cold. It can get annoying taking clothes on and off while hiking (especially if it's cold out and you need to remove your gloves), but you'll stay much more comfortable (and safe) if you do.
When you reach the summit, or take an extended break, it's really nice to reach into your pack and throw a down jacket on. Try to get a down jacket that has a fill weight of 800, although 650 or 700 is also generally fine too. The very best down jackets are usually 800-900 weight and can cost $200-$300 or more.
If you'll be winter camping, make sure you bring a complete change of clothing. You do not want to sleep in the clothes that you hiked in since they are extremely likely to be at least partially soaked from sweat.
DETERMINING TRAIL CONDITIONS
Before you hike in winter, you need to try to determine the trail conditions that you are likely to encounter. This must be done so you can determine if you will need to bring traction (such as Microspikes or Hillsound Trail Crampons), full crampons, and/or snowshoes. Sometimes it is relatively easy to gauge trail conditions, but sometimes it can be challenging to do so.
Start the process of predicting trail conditions by looking at the NOAA's New England Snow Depth Map. This map is normally updated on a daily basis, but it sometimes takes NOAA an extra day or two to update the map after a significant storm. When you are looking at the map, pay very close attention to the colors. The colors are a good indicator of what you can expect in terms of conditions. Here is a general guide of what to expect based on snow depth:
- 1-12 INCHES DEEP - If you see snow depths of this amount, foot traction and/or crampons will generally be needed. Snowshoeing is likely to be poor.
- 12-20 INCHES DEEP- If you see snow depths of this amount, it is very difficult to determine whether or not you will need foot traction, crampons and/or snowshoes. Snowshoeing could range anywhere from poor to very good. It is best to carry traction and snowshoes when you see snow depths in this range.
- 20-30 INCHES DEEP- If you see snow depths of this amount, you can generally expect snowshoeing conditions to be good, very good, or better. Generally speaking, foot traction or crampons will not be needed (except if you are traveling above treeline or you are on a trail with huge ice flows)
- 30-40 INCHES DEEP - If you see snow depths of this amount, you can generally expect snowshoeing conditions to normally be excellent or at least very good.
- 40-50+ INCHES DEEP - If you see snow depths of this amount, you can generally expect snowshoeing conditions to be outstanding. When the snow is this deep, it's time to drop everything you are doing and head to the mountains to go snowshoeing (this depth of snow is quite rare these days, and it's now fairly common for the White Mountains to go several years without obtaining this depth).
- Keep in mind that snow depths may not apply above treeline. Snow is often blown around in the alpine zone, so sometimes you'll find minimal snow and sometimes you will find massive snow drifts, depending on where you are above treeline. It is often best to bring crampons with you if you are traveling above treeline in winter. Sometimes people get away with just snowshoes and sometimes people get away with other foot traction (Microspikes, Hillsounds, etc.) above treeline in winter, but it is always a risk to go above treeline without crampons.
After you have looked at the New England Snow Depth Map, check recent trail conditions on Trailsnh.com. Trailsnh.com accumulates the trip reports from all of the major hiking forums, blogs, and trail condition websites on the internet (such as Newenglandtrailconditions.com and Vftt.org) and puts them into one one central source. You can search or browse through trip reports for all of the 4000-footers (plus other peaks that are below 4000-feet).
Another great resource you should always check is the page of AMC Backcountry Conditions. This link shows you 24-hour recent snowfall as well as the current total snow depth of several very specific locations in the White Mountains. As long as the locations have been updated (they always state the date of the last update for each location), it is extremely accurate (I've never seen it be incorrect). This website also typically recommends the type of gear that you will need (i.e. traction or snowshoes).
I also like to check the "snow/mountain reports" of various ski resorts in the White Mountains prior to hiking. This can give you a great idea how much snow has fallen in the last 24 hours, and also sometimes in the last 48 or 72 hours. I usually check the websites of Bretton Woods, Cannon Mountain, and Wildcat Mountain (there are other ski resorts that you can check too).
You have to be careful with river crossings in winter as well. Check this website to see how the East Branch of the Pemigewasset River and the Saco River are flowing. If the Saco River gauge near Conway is flowing above 4.0-4.5 feet, some river crossings have the potential to be difficult or even dangerous on peaks near that area. Some rivers do develop good 'snow bridges' over them in winter, and you should read online trail conditions to see the current status of such bridges and river crossings.
Another resource for determining trail conditions is to simply ask the hiking community. You can do this on any of the popular hiking forms (such as Vftt.org and Hike-Nh.com) or you can post a question to one or more of the 4000-footer groups on Facebook (there are several, including Hike the 4000 Footers of NH and The 4,000 Footer Club-Climbing and Hiking in New Hampshire). Before you ask a question, do a search of the group to see if someone else has already recently asked the same question.
WEATHER / WEATHER CONDITIONS
Just like you should be doing in the summer, check the Mount Washington Observatory Higher Summits Forecast the morning before each hike (it usually gets updated between 4:00am-6:00am each morning). This forecast can you help you gauge how the above-treeline peaks are likely to behave on a winter day. Mt. Washington is usually the most extreme of all the 4000-foot peaks, so hikes will sometimes downgrade the forecast a fair bit. This is a bit of a dangerous game though, because peaks like Mt. Adams, Mt. Madison, Mt. Jefferson, Mt. Lafayette, Mt. Lincoln and the Bonds (among others) can closely mimic the severity of weather that Mt. Washington is experiencing.
It is also wise to check multiple weather sources in case one forecast service is noticing a weather trend that others are not. I always check both weather.com and noaa.gov. Others check accuweather.com, mountain-forecast.com, and wunderground.com. I recommended checking at least two of these five websites within 1 hour of the start of your hike.
Temperatures in the White Mountains in winter generally range from -30 degrees all the way to +50 degrees. The temperature you get is all about where the air is coming from; if an arctic blast is occurring, the tallest peaks can see -20 or -30 degree temperatures at their summits, with wind chills much, much colder than that. The normal high temperature in the mountains on most days in January, February & March is usually 15-35 degrees (near the summit can be colder than this, though). The normal high temperature in the nearby towns/valleys (such as Lincoln and North Conway) on most days in January, February & March is usually 25-42 degrees.
Hiking when it's below -0- degrees and/or when its very windy is not very comfortable, unless you are an expert on layering and have all the fancy (and often expensive) clothing that will keep you warm and dry. Alternatively, hiking in winter when there is little wind and the temperate is between 20-32 degrees is pure bliss. Be aware that if you hike during winter and the temperature is above 32 degrees, the snow conditions can be tough and you may find snow from the trees melting down onto you. Rain is also fairly common in winter, and hypothermia can set in very quickly if you don't stay dry (waterproof pants & jackets are a must when it's cold & rainy in winter).
Generally speaking, you don't want to be hiking above treeline in winter when the wind is blowing more than 25-30 mph. Whiteouts can easily occur, and the wind chill can be nasty too (Mt. Washington occasionally has wind chills of lower than -50 degrees!).
FOOD FOR WINTER HIKING
You have to be careful of the types of food that you carry in winter. Many foods with a high water content will become rock-solid quickly in winter (some foods will harden after only a few minutes). Here are some foods that are recommended for winter because they won't become rock-solid:
- Nuts (almonds, cashews, pecans, peanuts, walnuts, mixed nuts, etc.)
- Granola
- Gorp
- Jerky
- Oreos
- Crackers
- Graham crackers
- Granola bars (although some brands will get quite hard in cold temperatures)
- Cookies
- Cheese
- Dry cereal (i.e. Cheerios, Frosted Mini-Wheats, etc.)
- Chex-Mix
- Fritos
- Pepperoni
- Salami
- Corn chips
- Raisins
- Chocolate (you'll want to warm the chocolate in your mouth for a minute or two before you start chewing it)
- Dried Fruit (depending on the brand, the fruit may stick to the packaging in the cold)
- Stainless steel container (e.g. Yeti bottle) containing chili, soup, beef stew, or hot chocolate
Generally speaking, you want to AVOID bringing energy bars because most brands and flavors will become too hard to chew (unless you eat them within the first hour or so of hiking). Some energy bars are better than others, however, and so you may want to test your favorite brands to see how they perform in winter. Gummy snacks can sometimes be OK, but are usually tougher to chew in winter than they would be in warmer weather.
Sports drinks like Gatorade have a freezing temperature that is only slightly lower than that of water. You should still expect sports drinks to freeze very quickly in winter, unless you buy them in powder form and/or store the drink in an insulated bottle. You can also put a bottle inside of a insulated bottle holder just like you would do with water.
SELECTING SNOWSHOES
Most hikers agree that the following snowshoes are the absolute best you can buy for hiking the 4000 footers as of 2020:
- MSR Denali (discontinued, but you can often still find them on eBay)
- MSR Evo
- MSR Evo Ascent (discontinued, but you can often still find them on eBay)
- MSR Lightning Trail (make sure to get the MSR Lightning Trail and not the MSR Lightning Explore)
- MSR Lightning Ascent - my top choice/highly recommended!
- MSR Revo Ascent (make sure to get the MSR Revo Ascent and not the MSR Revo Trail or the MSR Revo Explore because these other snowshoes don't have enough cross-straps in my opinion)
- Tubbs Flex RDG
- Tubbs Mountaineer
- Tubbs Flex VRT
- Tubbs Flex Alp
- Atlas Aspect
- Atlas 1225
My top choice/recommendation out of all the snowshoes currently on the market would be the MSR Lightning Ascent snowshoes. They are tried and true, and literally used by thousands of winter hikers in New England.
There are some other snowshoes (made by the above brands and other brands that I have not listed) that are sometimes sufficient for some of the 4000-footers, depending on the current conditions. Just make sure that the snowshoes that you buy or use have an aggressive-enough crampon and several straps/buckles to keep your feet in place on mountainous terrain. I don't recommend buying any snowshoes that are for "rolling" terrain.
There are so many factors to consider when it comes to the sizing of snowshoes, but I generally recommend 20-22 inches if you are 170 lbs or less, 25 inches if you are 170-250lbs, and 25-30 inches if you are 250+ lbs. When sizing snowshoes, keep in mind that trails become packed very quickly, so having maximum flotation is generally not important or even necessary. You'll see snowshoes out there that are 30-36 inches, but these are simply too long for most people on the 4000-footers in my opinion. For 95% of hikers, 20-25 inch snowshoes will be sufficient for the 4000-footers.
One thing that you can purchase for many brands of snowshoes is 'tails'. This allows you to get a smaller snowshoe, because you can convert them to longer ones if/when needed by simply adding the tails (which normally come in 4 inch or 8 inch sizes).
SELECTING FOOT TRACTION
Most hikers agree that Microspikes and Hillsound Trail Crampons are the premier traction systems for hiking the 4000 footers in winter (when snowshoes are not necessary). Hillsounds have a new product for 2014 called Hillsound Trail Crampons Ultra that look extremely promising as well.
Yaktrax (all models of them) and Stabilicers (the Light Traction and Sport Lightweight models) are generally not robust enough to be useful on the 4000-footers. The "Original Heavy Duty" model of the Stabilicers used to be quite popular before Microspikes hit the market, and are still considered sufficient for
many 4000-footers. However, most will agree that Microspikes and Hillsound Trail Crampons are superior.
Some people also create some DIY "screw-boots". If you do this correctly, they can be quite useful for the 4000 footers.
Keep in mind there are a lot of situations in which crampons are absolutely needed - especially above treeline. Microspikes, Hillsounds, Screw-Boots, etc. are often not sufficient on steep ice and/or above treeline.
HIKING ALL OF THE 4000-FOOTERS IN WINTER
According to the 'rules', if you want to claim that you have hiked all 4000-footers in winter, you need to hike each mountain within the actual astronomical winter, which begins on the winter solstice (on or around December 21) and lasts until the spring equinox (on or around March 21). There is a specific time (to the minute) of each of these days that serves as the start-and-end times. Your hike must start after the start-time in December, or end before the end-time in March.
You cannot snowmobile any portion of any trail (nor any road that is closed in winter).
If you do, it does not officially 'count' towards hiking the 4000-footers in winter. The rest of the "rules" that determine whether or not you've officially climbed a 4000-foot mountain can be founded here.
WINTER HIKING ETIQUETTE / LEAVE NO TRACE ('LNT')
There are ways we can all make winter hiking enjoyable for all other hikers who will later travel in our footsteps. I have made a list below of how we can be courteous to the hikers who come after us. Don't consider these as 'rules' - instead, consider these items just as proper winter hiking etiquette.
- Please do not bury toilet paper in the snow. When the snow melts, the toilet paper will remain and be visible to all other hikers.
- Please try to step far enough off of the trail when you have to pee. Nobody likes to see yellow snow in the middle of a winter wonderland. If you absolutely must pee close to the trail, make sure to cover it up extremely well with snow after you are finished.
- Please use snowshoes or skis whenever it is feasible to do so. If conditions are good for snowshoeing, and you skip using them (and bareboot or only use Microspikes or Hillsounds instead), you are likely to 'posthole' and leave deep gaping holes of your footprints in the snow. This wreck havocs on the snowshoeing conditions for other people who actually want to snowshoe, and has actually caused a few leg injuries in the past.
- This is a hot topic at the moment, with fierce debates often occurring between hikers in online forums and on Facebook 'Groups'.
- Place like the Adirondacks actually have laws that require people to use snowshoes once the snow depth is great enough. If we all respect each other and use snowshoes whenever appropriate, perhaps the White Mountain National Forest won't ever see a need to implement such laws.
Few people are open to listening to others tell them what they should and should not do in the mountains, but the fact is we all have the right to enjoy these trails in winter. When you don't follow proper etiquette, you are undeniably affecting the hiking experience of others - there is just no argument about it. Some hikers will argue over the use (or non-use) of snowshoes to death, but the fact is people who swear off snowshoes are usually either inexperienced, have never actually had the pleasure of snowshoeing in good conditions, and/or they do not own or cannot currently afford snowshoes at this point in time.
Everyone should have an equal opportunity to enjoy nature in winter - please consider adopting good winter trail etiquette.
EASIEST 4000-FOOTERS IN WINTER
Here is a list of the EASIEST 4000-foot peaks to hike in winter:
Cannon - via Lonesome Lake > Kinsman Ridge Trail (just be aware that traction, or perhaps even crampons, may be required for several steep sections near the top of the Kinsman Ridge Trail)
Field - via Avalon Trail > Willey Range Trail or via Avalon Trail > A-Z Trail > Willey Range Trail
Pierce - via Crawford Path > Webster Cliff Trail
Tecumseh - via Mt. Tecumseh Trail (from the trailhead located in the parking area of the Waterville Valley ski resort)
Tom - via Avalon Trail > A-Z Trail > Mt. Tom Spur
Waumbek - via Starr King Trail (make sure to continue past the summit for great views)
The easiest 4000 footer to hike in winter is either MOUNT TOM from US-302 or MOUNT TECUMSEH from the Waterville Valley ski area.
If weather conditions are good, MOUNT PIERCE is the most rewarding of the easier 4000-footers in winter. The view of the southern Presidential Range from the summit of MOUNT PIERCE on a fine winter day is fantastic. Take note that in poor weather, it is possible to get disoriented or even potentially lost near the summit of Mount Pierce.
MOST DIFFICULT 4000-FOOTERS IN WINTER
The following 4000-footers are generally considered the most DIFFICULT ones to hike in winter:
Adams - lots of elevation gain; some sections can still be very rocky in winter; weather can be extremely nasty above treeline
Bond - extremely remote; requires a minimum hike of at least 19 miles round trip
Bondcliff - extremely remote; requires a minimum hike of at least 18 miles round trip
Isolation - remote; it can take several weeks for trails to be broken out well to this peak; the semi-popular 'Engine Hill bushwhack' may be tough to follow
Jefferson - weather can be extremely nasty above treeline
Lafayette - crampons are often required between the AMC Greenleaf Hut and the summit; weather can be extremely nasty above treeline
Lincoln - weather can be extremely nasty above treeline
Madison - lots of elevation gain; some sections can still be very rocky in winter; weather can be extremely nasty above treeline
Monroe - lots of elevation gain; some sections can still be very rocky in winter; weather can be extremely nasty above treeline
Owl's Head - very remote; requires a hike of at least 18 miles round trip (although this gets decreased to 16.0 miles if you take the Black Pond bushwhack); involves hiking up a steep slide or bushwhacking to the side of it
Washington - lots of elevation gain; some sections can still be very rocky in winter; weather can be extremely nasty above treeline
West Bond - extremely remote; requires a minimum hike of at least 19 miles round trip
Wildcat & Wildcat D - all trails are steep
Zealand - requires a minimum hike of at least 18.8 miles round trip
GREAT 4000-FOOTER SNOWSHOE HIKES
The following 4000-footers are a true pleasure to snowshoe in winter, assuming there is deep snow with favorable conditions. I recommend visiting trailsnh.com to read trip reports that have information on the latest trail/snow conditions.
Cabot
Carrigain - this is quite a long day-hike in winter because the normal access road is closed (this adds 4.0 miles round-trip)
Field
Garfield - however, this is quite a long day-hike in winter because the normal access road is closed (this adds 2.4 miles round-trip)
Hale - this is a longer long day-hike in winter because the normal access road is closed (this adds 5.5 miles round-trip)
Kinsman, North - this is a fairly long day-hike though (I recommend hiking this peak via the Mt. Kinsman Trail off NH 116)
Kinsman, South - this is a fairly long day-hike though (I recommend hiking this peak via the Mt. Kinsman Trail off NH 116)
Passaconaway
Pierce
Tecumseh
Tom
Waumbek
Willey
ROADS THAT ARE CLOSED IN WINTER
Some of the 4000-footers require longer hikes in winter because their normal trailhead access roads are CLOSED.
Carrigain - Sawyer River Road is closed (this road-walk adds 2.0 miles each way and 600 feet of elevation gain)
Eisenhower - Mount Clinton Road is closed (this mountain is instead typically climbed in winter via the Crawford Path from Mt. Pierce)
Galehead - Gale River Loop Road is closed (this road-walk adds 1.5 miles each way; this can be shortened if you follow existing herd paths / X-C ski trails)
Garfield - Gale River Loop Road is closed (this road-walk adds 1.2 miles each way)
Hale - Zealand Road is closed (this adds 2.7 miles each way; the winter trailhead is on US 302 0.2 miles east of Zealand Road)
Jefferson - Jefferson Notch Road is closed (this mountain is instead typically climbed in winter via Jewell Trail > Gulfside Trail instead)
Moosilauke - Ravine Lodge Road is closed (this road-walk adds 1.6 miles each way)
Osceola - Tripoli Road is closed (in winter, reach Osceola via a very-steep route from NH 112 / the Kancamagus Highway)
North Twin - Haystack Road is closed (this mountain is often hiked via Little River Road / herd-paths in winter)
South Twin - Haystack Road is closed (this mountain is often hiked via Little River Road / herd-paths in winter)
Zealand - Zealand Road is closed (this adds 3.7 miles each way; the winter trailhead is on US 302 0.2 miles east of Zealand Road)
The status of all major roads in the White Mountains can be found on the WMNF Roads Status page of the US Forest Service's website. Take note that the US Forest Service can sometimes be very slow to update their website. You can always call one of their ranger stations for updated conditions.
Generally speaking, all roads in the White Mountains are generally open from mid-to-late May through early-to-late October.
HOW OFTEN ARE CRAMPONS REQUIRED?
Microspikes, Hillsounds and other forms of "light traction" are not the same thing as crampons. Crampons are far more aggressive and are often needed to tackle icy or steep terrain in tough winter conditions.
Before you review this section, you must understand that ANY of these peaks could require crampons under certain trail conditions. It's very tough to predict what trail conditions you will encounter, but you can increase your knowledge by reading the latest trail conditions at trailsnh.com.
The notes below are based on the standard route of each mountain. For a list of the standard routes of each mountain, please see the appropriate section above.
Adams - crampons are almost always required (an ice ax is often needed as well)
Bond - crampons are almost always required
Bondcliff - crampons are almost always required
Cabot - crampons are NOT typically needed
Cannon - crampons are sometimes needed
Carrigain - crampons are NOT typically needed
Carter Dome - crampons are sometimes needed
Carter, Middle - crampons are sometimes needed
Carter, South - crampons are sometimes needed
Eisenhower - crampons are almost always required
Field - crampons are NOT typically needed
Flume - crampons are sometimes needed
Galehead - crampons are NOT typically needed
Garfield - crampons are NOT typically needed
Hale - crampons are NOT typically needed
Hancock - crampons are often needed
Hancock, South - crampons are often needed
Isolation - crampons are sometimes needed
Jackson - crampons are often needed
Jefferson - crampons are almost always required (an ice ax is often needed as well)
Kinsman, North - crampons are NOT typically needed
Kinsman, South - crampons are NOT typically needed
Lafayette - crampons are almost always required (an ice ax is often needed as well)
Liberty - crampons are sometimes needed
Lincoln - crampons are almost always required (an ice ax is often needed as well)
Madison - crampons are almost always required (an ice ax is often needed as well)
Monroe - crampons are almost always required (an ice ax is often needed as well)
Moosilauke - crampons are often needed
Moriah - crampons are often needed
Osceola - crampons are almost always required (an ice ax is often needed as well)
Osceola, East - crampons are almost always required (an ice ax is often needed as well)
Owls Head - crampons are almost always required (an ice ax is often needed as well)
Passaconaway -crampons are NOT typically needed
Pierce - crampons are NOT typically needed
Tecumseh - crampons are NOT typically needed
Tom - crampons are NOT typically needed
Tripyramid, Middle - crampons are often needed
Tripyramid, North - crampons are often needed
Twin, North - crampons are often needed
Twin, South - often needed
Washington - crampons are almost always required (an ice ax may also be needed)
Waumbek - crampons are NOT typically needed
West Bond - crampons are almost always required
Whiteface - crampons are often needed
Wildcat - crampons are often needed
Wildcat, Peak D - crampons are often needed
Willey - crampons are NOT typically needed
Zealand - crampons are NOT typically needed
4000-FOOTERS THAT CAN BE PARTIALLY SKIED
Some of the 4000-footers can be partially skied, although good snow conditions can be rare. See trailsnh.com to read online trip reports that provide good beta on the latest winter/snow conditions.
Cannon - ski resort trails & backcountry trails
Flume - Flume Slide Trail (insanely steep)
Hale - bushwhack to reach its birch glades
Moosilauke - Carriage Road
Tecumseh - ski resort trails
Washington - there are many backcountry trails and routes on this mountain
Wildcat - ski resort trails & backcountry trails
TRAILS WITH GOOD BUTT-SLIDING/SLEDDING IN WINTER
Many of the 4000-footers offer good butt-sliding/sledding opportunities when good snow conditions are favorable.
Before you read this list, please understand that butt-sliding/sledding is a controversial activity. In order to be a team-player and ensure the safety of both yourself and others, always ensure that the section of trail that you intend to slide/sled down is completely free of other hikers. To a winter hiker, there isn't much that is more terrifying than having a sledder barreling down at them at a fast rate of speed. To be on the safe side, it is best to avoid sliding/sledding on weekends where the odds of hitting another hiker are far greater. Or, better yet, you can try hit the trails extremely early or very late in the day whenever you want to slide/sled.
I do NOT recommend butt-sliding/sledding with your dog (leashed or unleashed). They could easily get hurt by your sled or if they try to keep up with you.
Some believe that butt-sliding/sledding can negatively impact hiking trails. They believe that trails can get worn down and that hiking will accordingly become more difficult. I encourage you to contemplate such things before you partake in this activity.
If you decide to try butt-sliding/sledding, here is where you can do it:
Adams - Lowe's Path
Cannon - Kinsman Ridge Trail
Carter Dome - Carter-Moriah Trail (very steep!)
Field - Avalon Trail (this ride can be a total blast!)
Hale - Hale Brook Trail
Hancock - Hancock Loop Trail (lots of fun, but snow pack needs to be quite deep)
Hancock South - Hancock Loop Trail (lots of fun, but snow pack needs to be quite deep)
Liberty - Mount Liberty Trail (only a few sections near the top)
Middle Tripyramid - Pine Bend Brook Trail
Moosilauke - Glencliff Trail
North Tripyramid - Pine Bend Brook Trail
Pierce - Crawford Path
Tecumseh - Mount Tecumseh Trail
Tom - A-Z Trail (only a few sections of the trail)
Waumbek - Starr King Trail
Willey - Avalon Trail (this ride can be a total blast!)
OTHER GREAT SNOWSHOE HIKES IN THE WHITE MOUNTAINS
I recommend that you snowshoe to one or more of these destinations before you attempt to snowshoe one of New Hampshire's 4000-footers. Each of the hikes listed below makes for an excellent snowshoe hike, assuming that the current snow depths are sufficient enough for snowshoes to be used.
Arethusa Falls - tip: go and watch the ice-climbers climb up the left face of the falls
Bridal Veil Falls
Carter Notch Hut
Doublehead Mountain - tip: rent the USFS cabin overnight and bring firewood to use in the wood stove
Echo Lake/Cathedral Ledge
Ethan Pond
Greeley Ponds
Imp Face
Kearsarge North
Lonesome Lake
Mt. Crawford
Mt. Willard
Peaked Mountain
Tuckerman Ravine-Base - tip: go watch the extreme skiers test their skills from late March to early May)
West Rattlesnake
TOP 4000-FOOTER WEBSITES
These are the top websites on the internet dedicated to the 4000-footers of New Hampshire
4000-FOOTER FACEBOOK GROUPS
I highly recommend that you strongly consider joining these 4000-footer related groups on Facebook. These groups have many great posts with wonderful photographs and trip reports. You can often discover up-to-date trail conditions as well.
4000-FOOTER LOG/SPREADSHEET
Click here to download a Microsoft Excel 4000-footer log spreadsheet that you can use to track all your 4000-footer hikes (including fields for listing the dates & your hiking partners)
GUIDEBOOKS TO GET YOU THERE
The following guidebooks are trusted resources to help lead you to many or all of the 4000-footers of New Hampshire:
AMC White Mountain Guide (31st Edition)
4000-Footers of the White Mountains (3rd Edition)
Climbing New Hampshire's 48 4,000 Footers (1st Edition)
Click on any links above to read reviews and/or purchase these books on Amazon.com (affiliate).
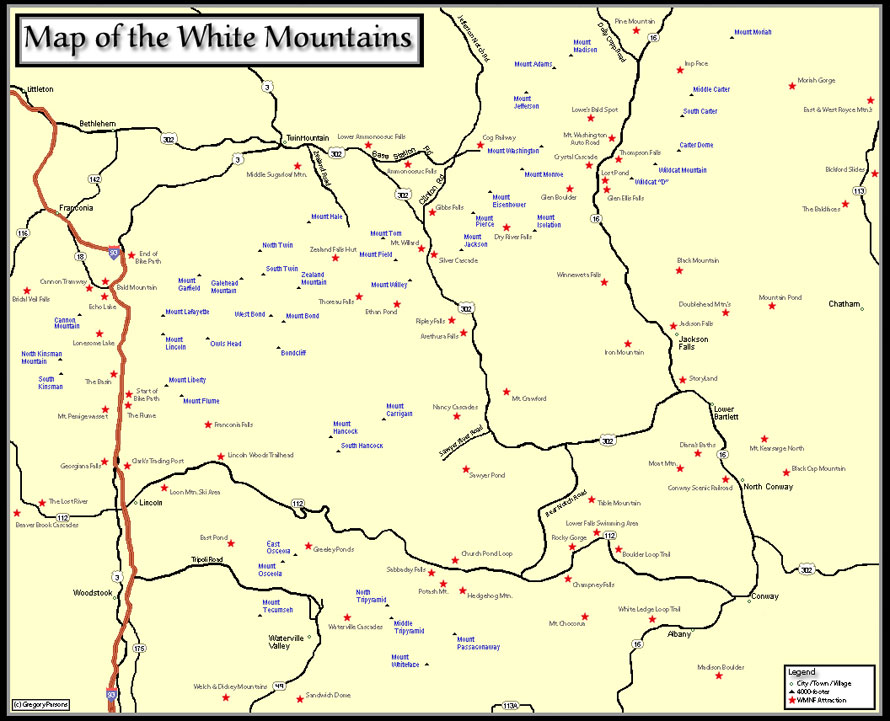
MAP OF THE 4000-FOOTERS
Feel free to save or print this .JPEG map of the 4,000-footers (which are marked in blue). I've also listed many other of the top attractions in the White Mountains with a red star. Take note that Mt. Moosilauke, Mt. Waumbek, and Mt. Cabot are not shown on this map. At some point I hope to update this map to make it larger and include more of the best attractions of the White Mountains.
|


